WHAT'S NEW?
Loading...

How to Customize or change start button icon


Windows 8.1 Start Button Changer is a freeware from door2windows which lets you easily change the start button in Windows 8.1.

Download Windows 8.1 Start Button Changer from here + added 16 icons selected by me

Once the app is downloaded Run the app then click on CHANGE button 


Browse and select the image which you want to display as the new start button. then click on open 

Windows Explorer will restart automatically and the new start button will be displayed.


                            Want more icons? Click here


How to run chrome os on pc using virtual box

  1. Chrome OS is an operating system based on the Linux kernel and designed by Google to work with web applications and installed applications.

 In order to run chrome os on pc we need virtual box (VirtualBox is a general-purpose full virtualizer for x86 hardware, targeted at server, desktop and embedded use.) 
in simple words virtual box allow us to run multiple os at one time


Then download chrome os vdi file from here
select virtual box on the download page and then click on download . Once the file is downloaded extract it any where using wirar,7zip or any extraction tool

After you have downloaded virtual box & chromeos.vdi file 
start your virtual box > then click on new button 


 then a new window will appear , name the operating system then select operating system type as Linux and Version: Other Linux


Click on next 

then in the next window select half of your pc ram .If you have a decent amount of RAM in your computer, feel free to 
increase the amount of RAM allocated to Chrome OS.

Then click on next 

then choose Use an existing virtual hard drive file and browse to the Chrome OS .VDI file you extracted earlier.

 then click on create and after that click on start , when you start chrome os your mouse won't work . to make it work press right ctrl + I and click on capture 


It takes few seconds to start and present you some setup screens

then select your language and internet connection click on continue after that login with your gmail account


and done , enjoy your chrome os☺☺☺☺☺☺ 


Regular visit our blog and stay updated


Turing Phone,this smartphone is extra-secure and stronger than steel

Every once in a while you see a phone that’s so impressive you can’t ignore it, even if you know it’s not going to be your next phone. Such is the case with the Turing Phone, a Lollipop-powered Android handset that’s not only supposed to be more durable than any other smartphone on the planet, it’s also seemingly far more secure than rival handsets.


As CNET reports, the Turing Phone, made by Turing Robotic Industries, is made by liquidmorphium and it features advanced data security.
Liquidmorphium isn’t the metal injected into Wolverine’s body. It’s an “amorphous alloy of zirconium, copper, aluminum, nickel and silver,” and it has an atomic structure that’s more like glass than aluminum or steel, but much stronger than either of those metals. The phone also has certain elements made of ceramic and aluminum.
The Turing Phone has a 5.5-inch 1080p HD display, 2.5GHz Qualcomm Snapdragon 801 processor, 3GB of RAM, 64/128GB of storage, 13-megapixel camera and 3,000 mAh battery.
As for the Android security side of things, the Turing Phone is probably a rival for Silent Circle’s Blackphone handset. The device packs a Turing Imitation Key security chip that authenticates encryption locally, which means it’s always offline and out of hackers’ reach, unlike third-party services that issue security certificates from online servers. The downside of the feature appears to be that you can only exchange encrypted data in such a manner with other Turing Phone owners.
The Turing Phone will start selling on August 10th priced at $750 for the 64GB model and $870 for the 128GB model. A 16GB version is also in the works, but pricing isn’t available yet.
More pictures showing the Turing Phone follow below.

  
                                                 P.C - http://bgr.com/

Update your Friends Facebook Status (Facebook Prank)


If you are looking for messing with a Facebook friend, then you are at the right place. In This Article you will Learn how to Update your friends Facebook status via Facebook upload.php? 

This Prank might give your friend a break down.


Let's Get Started

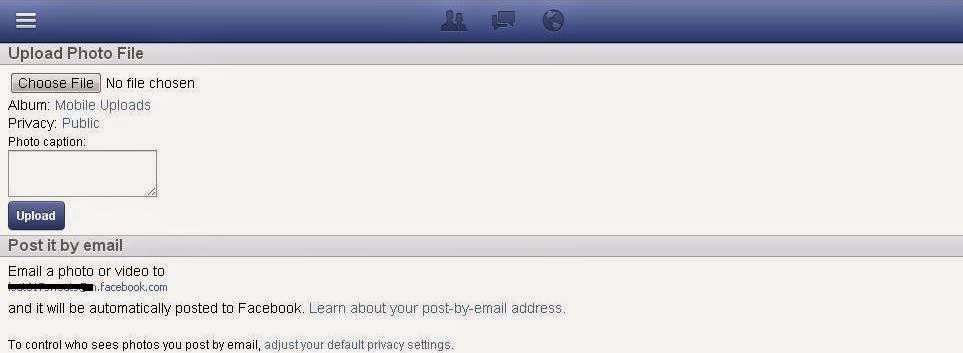
Step 1: Make sure to send this link: (https://m.facebook.com/upload.php?email&_rdr), to the person you want to target. A New Facebook window will open up just like in the image below

Step 2: Ask the victim to give you the email address That he saw on the link you gave him just like the one beneath "Post It By Mail" In the picture above

Convince Him Like This

 "Hey man there's a problem with my Facebook ID, It is showing a new email to every person who goes to the link. Please forward me the email Address that you can see here. I wanna check if its still the same or has the bug been fixed :'("


This Might Do the trick ☺☺☺☺☺

Step 3: Log in to your Gmail Account, and hit "Compose a new message"

Step 4: Type the email the, one that your victim gave you in the send to box and the message you wanna post in the subject box like this


Step 4: Hit the send button and check your victims timeline :-P

Defend Internet Freedom in India!


Send TRAI your views, protect #NetNeutralityIndia and #SaveTheInternet - www.savetheinternet.in


he internet's success in fostering innovation, access to knowledge and freedom of speech is in large part due to the principle of net neutrality — the idea that internet service providers give their customers equal access to all lawful websites and services on the internet, without giving priority to any website over another.
Due to intense lobbying by telecom operators like Airtel and Vodafone, the Telecom Regulatory Authority of India (TRAI) is planning to allow them to block apps and websites to extort more money from consumers and businesses — an extreme violation of net neutrality.

TRAI has released a consultation paper with 20 questions spread across 118 complicated pages and wants you to send them an e-mail by 24th of April, 2015.
Join us in fighting for net neutrality. Let’s remind TRAI that their job is to protect the rights of consumers, not the profit margins of telcos. Let’s demand access to the free, open internet.
                                           Submit your response to TRAI >>

What Is Carding? part-2

This summary is not available. Please click here to view the post.

What Is Carding? part-1


What Is Carding?

Carding is a way, by this way u can buy any product from online shopping sites..... in other words carding means hacked credit card From uniccshop.ru.


And Then We Go To Sites Like Shoping Or Else. And Then We Can Chose Any Product Of Price Which You Have Buyied By Money. We Can Buy 10000 Rs Credit Card By Just 600 Rs. So We Will Get Benifit Of So Many Rs. Now Select A Product. Enter Your Dilevery Address, In Payment Mode Select Credit Card And Fill Your Card Details. Then Complete Your Order.In This There Is No Chance Of Being Affraid Or Being Caught. For Your Safety You Can Change Your Ip Address With Vpn, Proxy Or Else. So Now Its Done. Enjoy Carding. Dont Share It.


Be Happy :)

=> How to change ip address

=> Amazon carding method
=> Ebay carding method
=> Snapdeal carding method
=> How to become a pro carder
=> 100bestbuy carding method

=> What Is Carding? part-2

How to force 3G only mode on any Android device


Many Android devices lack the option of enabling 3G only mode, providing only an option to switch to 3G preferred mode only. Often, 3G/WCDMA preferred mode leads the phone to switch to 2G in case 3G signals aren't that strong. While it isn't always good to operate your phone on weak signals, there are situations where you need faster interenet connection which makes sticking to 3G a must.


Enable 3G only network mode on any Android device:

  • Go to your Phone/Dialer app and dial the following USSD code: *#*#4636#*#*

A popup window will open something like this:


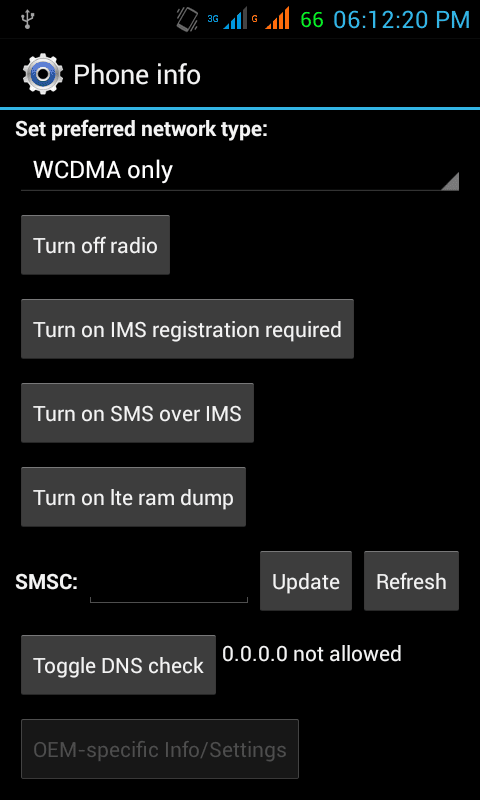
  • Select the first option from the list that appears i.e. Phone Information
  • Scroll down till you get to the Set preferred network type heading. By default, it might be on GSM only (i.e. 2G only) or WCDMA preferred (i.e. 3G preferred). Change this option to WCDMA only and your phone will automatically switch to 3G only mode.


  • Unless you understand what you are doing, don't tweak any other option in this menu as it can lead to problems.
If you are having a dual sim phone, you can go to Wireless and Networks >> More >> Mobile Networks >> 3G service and select which sim you want to activate 3G on.


Bonus tip: If you select the third option i.e. Usage statistics(from the popup that appears after dialing the USSD code *#*#4636#*#*), you will see an interesting breakdown of the time you've spent on your phone - which app you've used for the longest duration, which app has been launched the highest times etc.

How to move almost all Android apps to SD card (no root required)


One of the most anticipated additions to Android 2.2 (aka Froyo) was ability to install applications to SD card, because it helps to free internal memory. When internal phone memory gets full, Android users have two problems: 1) users can’t install any more apps and 2) phone starts working slowly. The slow down is caused by the lower speed of disk write operations to the internal memory (see this post for more information on this topic), but the bottom line is that having low available space in the internal memory is not desirable.
So what should a user do when Android phone is running out of internal memory? Uninstalling rarely used apps is an obvious and easiest solution. Moving apps that support Froyo’s apps2sd feature to SD card is another option. However, for this feature to work developers need to enable apps2sd in their apps and unfortunately many large apps still do not support it.
It turns out there is a hack that lets you move almost any Android app to SD card, even if the app developer did not enable this option. And the best part: obtaining root is not required for this to work. More about this hack below, but first let’s take look at the limitations of the Android apps2sd feature.
Apps2sd limitations
Apps2sd functionality is a step in the right direction. However, the way it is implemented creates some restrictions which you should know about:
When an app is moved to SD card, portion of that app still remains in the internal phone memory. On average, you can expect that application’s footprint in the phone memory will be reduced by a factor of 2. Note that for some apps the move will save less than 50%, e.g. Google Earth size in the internal memory reduces from 20.5 MB to 15MB, Adobe Flash Player 10.1 – from 12.4 MB to 8 MB.
If you use an app widget on your home screen, this app should not be moved to SD card, because the widget will stop working.
Android OS doesn’t have any batch tools to move all movable apps to SD card at once. You will need to manually move one app at a time by going through the list of installed apps in Settings->Applications->Manage Applications.
System apps such as Maps and Youtube cannot be moved to SD card using stock firmware on unrooted phone. On some phones Adobe Flash Player is pre-installed as a system app and also cannot be moved. Providers may also install bloatware as system apps, which also cannot be moved on unrooted phone. However, on a rooted phone system apps can be deleted or moved – see FAQ for details.

If you re-flash phone’s firmware, some backup applications may not restore your apps to SD card, but will restore them to the phone memory.
Despite these restrictions, moving apps to SD card is a good way to free up internal phone memory and speed up your Android phone.
Moving (almost) all Android apps to SD card
To run commands which will enable Move to SD card button for most installed apps, you need to have adb executable on your computer. Adb stands for Android Debug Bridge and is used for Android software development, but it is a very useful tool to have for any advanced Android user. You do not need to have a rooted phone to run adb commands.
To download the latest version of Android SDK (which includes adb executable), follow instructions from step 2 in the Installing the SDK article from the official Android development site. Note: you do not need to install any other software such as Eclipse for this procedure.
After downloading the archive of the SDK, unzip it to any folder and remember its location (let’s call this folder <sdk>).
If you are installing Android SDK on Windows machine, you also need to install USB driver as described in USB driver for Windows section.
Connect the phone using USB cable and do not enable USB storage mode. Go to Settings -> Applications -> Development and enable USB debugging.
Start terminal window on your computer (on Windows: click Start, type “cmd” and press Enter).
In the terminal window, navigate to folder containing file n

Most Trending