WHAT'S NEW?
Loading...

To get Rs 50 Paytm Recharge Voucher From Times Of India app :

1)To get the coupon install Times of India app and open it.

2)Go top settings and login with your facebook id.

3)Go to ‘offers’ under ‘settings’ in Times of india app.

4)You will get a coupon.Just copy this coupon to your clipboard.

5)Open PayTM app and and Log in or Sign up.

6)Input details of your mobile no. and put amount Rs 50.

7)Use the promo code you got from Times of India app and complete your recharge.

Android is an open source platform and because of its flexibility there are large number of android emulator for PC available online which will help you to play your favorite games and applications directly on your computer with very little effort.However you cannot experience the native android experience because these emulators are modified and most of them have limitations and restrict the installations of some apps and high-definition games.In such cases this tutorial will help you to run all android version on your system without any limitations.✔✔
Advantages of Running Android directly on Your PC:✔✔✔
1. Some of the popular emulators like Blue stacks updated recently and after that the minimum RAM requirement for installing it has increased to 2 GB from 1 GB.So users those who have 1 GB RAM cannot install the emulator and also your computer must have high-end configuration to properly run high quality games or it will completely slow down your PC.So most of the users miss the real android experience but if you run it directly you can do whatever with it and you will experience the real native android effect.
2. You will have direct access to Google Play Store and Google Play services will be installed by default.
3. It can run on any screen sizes which will results in real gaming experience.
Tools Required:
Required Android ISO image file(2.2 -5.0)-Downloaded from here 
If you need to run Lollipop 5.0 then download iso image file from here.
Updated Lollipop 5.0.2 – iso File
USB Stick (or) DVD/CD
PowerIso,Rufus to Create Bootable Flash Drive or  DVD.
How To Run Android L Directly On PC Without Android Virtual Box Or Emulator:
Follow the below mentioned steps for direct android installation.This is common for all versions starting with the latest Lollipop 5.0 ,Kitkat (4.4 – 4.4.4) ,Jelly Bean (4.1-4.3.1),Ice Cream Sandwich (4.0 – 4.04) and also for Gingerbread,Froyo and Honeycomb.
First create a bootable usb or CD using the tools mentioned above.You can find step by step method to create bootable pendrive in this post.

Then restart your PC and press the boot key(F12) to enter the boot menu.
Next select boot from USB and in the next window select Run without installation(first option).
You are done Android OS will directly run in your Windows system.
==================================================================================
If u run android using 1st option all u do on ur android will be temprary all your progress on ur android get deleted when your reboot your system
If you want a permanent android on your pc ( multi boot )
then choose the last option
Install android to Harddisk
and select any drive in which you want to install your Android L
but do not Format it*
then select yes when it ask for " do you want to install boot loader GRUB"
After that when it ask for the installer found a window partition do you want to create a boot item
then select YES and YES for the next msg
then create a partition for ramming your harddrive select yes
and type 2048 .ie 2gb of ram
then select reboot and waith for few seconds
And you r done
wait for 5 sec and your Android will starts automatically 

Today on TECH XPERTS we are going to see a detailed tutorial on how to install or dual boot both Android and Windows operating system in a single PC.So your computer will become your new android tablet. This tutorial is common for dual booting all versions of Android(Lollipop,Kitkat,Jellybean to Froyo) with Windows OS(10,8.1,7 and XP). This type of installation is useful when you want to keep all the application and game data an other installation as in direct run no data will be retained.
This method is 100% tested.This installation is common for both upgrading and downgrading Android Version(i.e if you had installed Kitkat and if you want upgrade to Lollipop 5.0.2 then just download the iso image and install and the vice verse.
Tools Required:
Android x-86 iso Image -> Click here
for android ver 5.0 click here
Rufus/PowerIso/UNetbootin -> Rufus , PowerIso , Uetbootin Download any one i recommend you to dowload Rufus
Pen drive (1 GB)
Step By Step Method To Dual Boot Android And Windows On PC:
1. First you have to create a bootable pendrive.
2. You have to make a new partition with minimum 3 GB space or you can use any of the partition that is already created by you in your system.
Note:For error free dual OS installation do not use the partition where your primary OS is installed and also the drive must be in FAT32 format.(If you had installed Windows in C drive then for Android installation you have to use other drive). If you have any doubt then the best solution is to create a new drive.
How to Create A New Partition To Dual Boot Android And Windows:
To create a new drive you have to access Disk Management in your computer.For that right-click on My Computer shortcut and click Manage.Next select the Storage option and there you will find the disk management.(or)
Simply go to RUN command by pressing Win+R ,type diskmgmt.msc and press OK.
Over there you will find all partition.Select any one of the partition where you have more free space.Right click on it and select shrink volume. 
 Next set the required space,3 GB space is enough for this ,so enter 3000(MB) in the third option and click shrink as shown in the below image.
Then right-click on it and choose New Simple Volume option.Keep clicking next until you reach format partition page and choose the file system as FAT32 as the file system as shown below.
Your new volume is ready for Android installation.
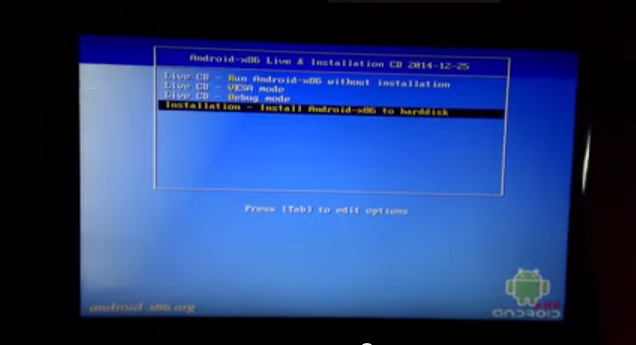
3. Now insert the bootable pendrive or DVD and restart your PC.Enter the boot menu(mostly F10 or F12) and select USB HDD and enter.In the next page click Installation-Install Android-x86 to harddisk.

4. Now in Choose Partition page choose the desired one(Win95 FAT32).(Note the sda number which will be required late,for example the sda number is 7  in the below image).

5. Then in the next page choose Do not  format.
6. In the confirmation page for Do you want to install boot loader GRUB?Press Skip
7. In the other confirmation page,The installer is going to create a disk image?Press Yes.
8. For the size of the data.img in MB just choose your desired size Min is 512MB and Max is 2047 MB
9. Next Reboot your computer.
10. Now extract all the contents form Grub2Win to the C folder(Folder in which Windows 7/8//8.1/10 is installed).
11. Now RUN grub2win.exe and in the next screen choose the Windows Boot Menu Title(optional) and press OK.
.
12. In the Grub2Win folder there will be a CFG file,just open it with Notepad and enter the following code below the
start-grub2win-user-section #
Android
menuentry “Android KitKat” {
set root='(hd0,Your sda number)’
linux /android-4.4-RC1/kernel quiet root=/dev/ram0  androidboot.hardware=android_x86 video=-16 SRC=/android-4.4-RC1
initrd /android-4.4-RC1/initrd.img
}
13. Replace Your sda number with sda number that you have noted in step no 4.
14. Save the notepad.Your dual boot android and windows computer is now ready.You can choose the required operating system when you start your computer.If you have any doubt leave your comments and we will try to help you.

Most Trending